Your layout probably contains tables or other structural elements. To ensure that these show the desired result, here are some tips for editing the layout file in the editor (e.g. Libre office)
Consistent headers and footers
Make sure to insert headers and footers in your layout.
For headers, it is a good idea to include a logo in the header of the first page, but not on subsequent pages.
In OpenOffice, you can add a header to your document via Insert > Header > Default.
Click in the header of the first page and press F11.
If you want to output the same header/footer on every page, select Standard.
If you only want to output this header on the first page of a document, select Page templates > First page. You can set up your own headers/footers for the following pages.
Tables in the document layout
The standard document layouts contain an item table with details of your products and prices and another table with details of the customer number and service date. These tables can be edited, you can add and remove columns and rows and create additional tables.
If you want to display several tables in one layout, all tables, except the item table,
must be embedded in frames so that the item table is clearly recognizable for Scopevisio.
To insert a new table, first click on Insert > Frame (Libre office) and place the frame at the position where the table is to be placed.
Click once next to (to fix the position) and then in the frame and then select Insert > Table. Specify the desired number of columns and rows and click OK.
Changing and splitting the position table
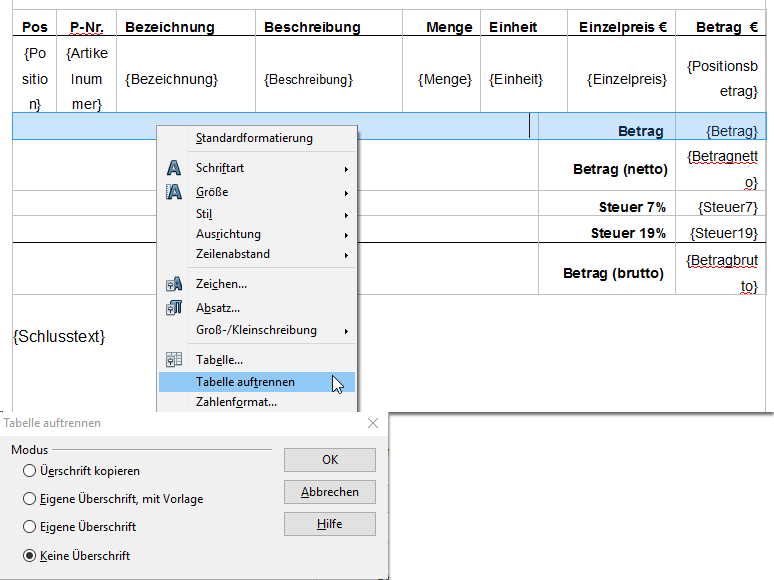
The position table consists of an upper area with transaction data in rows and a lower area that shows row totals. To delete columns in the upper section of the table or insert new ones without affecting the lower row totals, the table must first be split.
To do this, select the first "Totals row" completely, right-click on the selection and then select Split table > No heading.
The table is split above the selected row.
After you have made the desired changes to the columns, join the two separate tables again. Position the cursor between them and press the Del key.
Deleting or adding table columns
To delete columns, select them and then click on the Delete columns icon in the table toolbar.
To add a new column to the table, select the column next to which the new column is to be placed and click on the Add column icon in the table toolbar.
In Libre office, you can choose whether the column is to be added on the left or right.
Enter a name for the new column in the column header. Then click in the cell below and enter the appropriate placeholder in curly brackets.
Deleting rows from the item table
You can delete or add rows from the item tables and change their contents. This is useful, for example, if you typically do not grant a final discount or do not need to show shipping costs.
To do this, select the relevant table row and click on the Remove row icon in the table toolbar.
Customize font and page layout
The following standard fonts are supported by Scopevisio, please refer to our service description for other available fonts:
Arial
Book Antiqua
Bookman Old Style
Calibri
Cambria
Century Gothic
Courier New
Garamond
Georgia
Microsoft Sans Serif
Palatino Linotype
Tahoma
Times New Roman
Trebuchet MS
Verdana
Select the font for your documents from this pool. Other fonts are automatically replaced by a similar font from the list.
Note: The text that replaces the placeholder is inserted in the formatting of the corresponding placeholder. So if you have selected the bold formatting for the placeholder {amountGross} in the odt file, the amount figure in the PDF will also be printed in bold.
