Preliminary remark - please read carefully
Depending on the product line selected, Scopevisio offers several charts of accounts as templates when setting up financial accounting. The SKR03 and SKR04 charts of accounts based on the DATEV standard are most frequently selected.
By using one of our predefined charts of accounts, all the necessary settings for the entire ERP system have already been made. Starting with revenue accounts linked to products and predefined banking accounts through to the complete tax matrix and all standard financial reports, you receive an all-round package when you choose a standard chart of accounts.
If your individual chart of accounts can be traced back to one of the common standards or if you work with a standard extended by individual accounts, we always recommend using a standard chart of accounts as a basis. Individual (customized) accounts can be adapted at any time or simply added by duplicating them.
If none of the standard charts of accounts offered are suitable for you, Scopevisio also gives you the option of using a completely freely defined chart of accounts.
In this case, this document provides you with instructions on how to set up the Scopevisio ERP software yourself.
As the creation of a chart of accounts has far-reaching effects on the entire system, we would like to explicitly point out that this setup guide is aimed at financial accounting experts.
Please note that our free hotline cannot provide support for individual charts of accounts. However, we can offer you a system set-up service on request, which will make all the expert settings for you.
Regardless of whether you opt for an individual or a system chart of accounts, once you have chosen a template, it cannot be changed later. Set up your chart of accounts immediately after going through the setup wizard to ensure the basic connections throughout the system.
First, let's define the terms chart of accounts and chart of accounts.
Chart of accounts
The chart of accounts only contains the accounts in the chart of accounts that are intended for use. This makes work clearer in many places. In the drop-down help (selectors) you can see the maximum number of accounts in the chart of accounts.
You can view the chart of accounts via Global > Master data > Finance > Manage accounting > Chart of accounts or under System menu > Manage accounting > Chart of accounts.
Chart of accounts
The chart of accounts (or G/L chart of accounts, or G/L chart ofaccounts for short) includes all theoretically available accounts. As a rule, it also contains accounts that are not suitable for your company. For example, the SKR03 contains accounts for revenue-surplus accountants and balance sheet preparers as well as for partnerships and corporations.
Accounts from the chart of accounts can simply be transferred to the chart of accounts or moved back.
The sequence of steps
The same sensible sequence applies to both the import of accounts and the manual creation, allowing you to proceed as efficiently as possible. Please read the entire description through to the end first and then use this sequence to incorporate your chart of accounts.
Setup wizard
Create chart of accounts
Set up tax matrix
Set up advance sales tax return
Assign accounts to reports (balance sheet, P&L, BWA)
Further settings
Setup wizard
Go through the setup wizard and fill in the required and desired fields. Select your chart of accounts in the Finance step. Select the Individual template.
You will receive system-side instructions. Complete the setup wizard via the Banking and Settings tabs. Please note that you cannot create a house bank without an associated G/L account. You will have to do this step later.
Create chart of accounts
You have the option of importing accounts from a legacy system using a CSV file. Alternatively, you can enter your accounts manually. Both steps are described below. The field descriptions for manual creation correspond to the columns in the import table.
Change number range
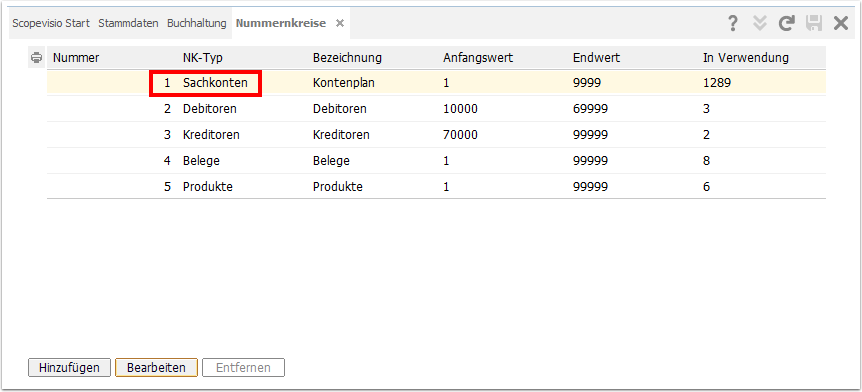
Initially, 4-digit account numbers are provided. If you want to create or import account numbers with more digits, first expand the number range for G/L accounts. To do this, select Global > Master data > Accounting / Manage accounting > Number ranges (new ribbon: System menu > Manage accounting > Number ranges). There you will find the table for number ranges. Then select the number range 1 G/L accounts and click on Edit.
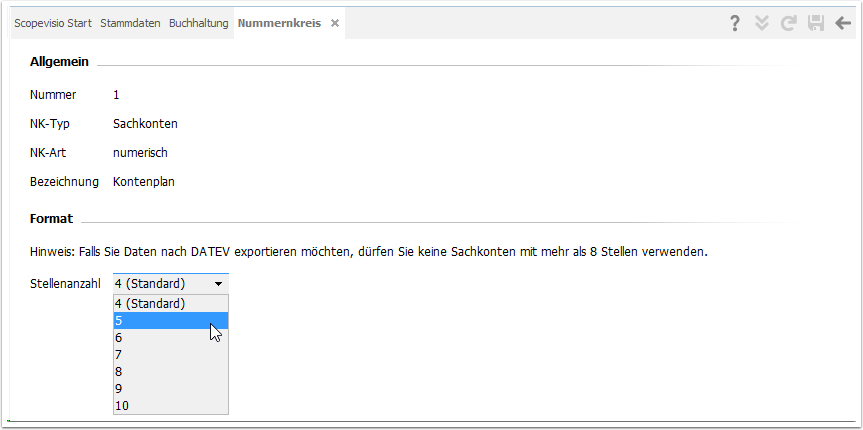
Important note: Once you have increased the number of digits, you cannot decrease it again. The number of digits can be increased to a maximum of 8, but this will hardly ever be necessary.
You will find the Number of digits field in the Number range form. Here you can vary the length of the account numbers.
Importing accounts in CSV format
You can import your existing chart of accounts via the Scopevisio interfaces.
Under OpenScope > Import & Export > Manage imports , follow the link to Import G/L accounts, creditors, debtors and posting records in CSV format. The G/L accounts tab contains the import mask for your G/L accounts.
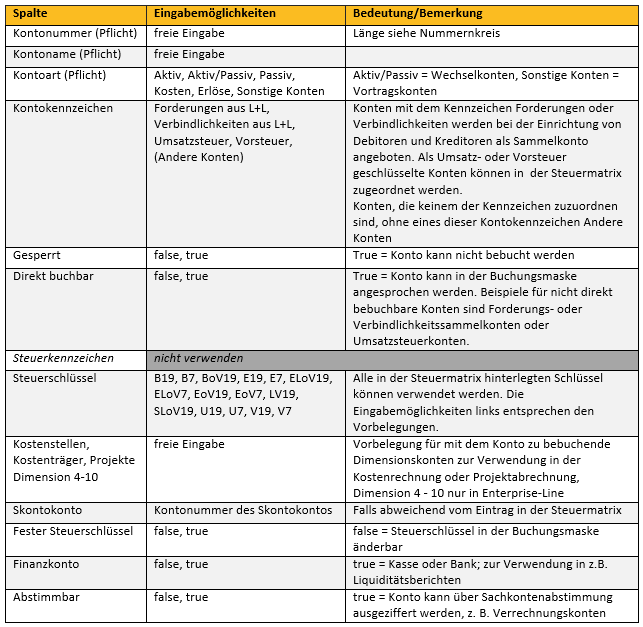
The first three columns of the table are mandatory columns:
Account (number of the G/L account),
Account name,
Account type (asset, liability, asset/liability, costs, revenue).
The other columns of the import mask are explained in more detail in the following table.
Account import - preparation
If you have an extensive chart of accounts, it makes sense to edit the TXT or CSV file before importing it into Excel and to set the required indicators and fill the required columns there. Make sure to save the edited file in CSV format.
Some information cannot be imported. This applies to the settings for
DATEV automatic account,
Filter document from USTVA and
the entire "Asset accounting" area.
Take a look at the explanation of these points in the following section. If one of the points applies to you, edit the corresponding accounts manually at a later date.


