Create invoices
Select Organization > Invoices > Add if you want to create a new invoice independently of an order.
As part of the document flow, you can also transfer an upstream document (quotation, order) into an invoice. The relevant data and items are transferred and can be further adjusted as required.
Many fields are initially pre-assigned. First fill in the yellow mandatory fields in the form. We will explain the most important fields of the individual business objects. We will then go into the lower part of the form with the various tabs.
Business object "Description of the invoice"
Project
Depending on the setting, the project is a mandatory field. If the project is addressed, the customer is filled in here.Customer
Your invoice recipient. Pay attention to the leading customer account number to ensure that the posting is made to a dedicated personal account. You can easily create a customer account via the overlay.
Contact person
This is your contact at the customer. Depending on the setting, the receipt is sent by email to the email address of this contact.Invoice area / billing area
Business object "Invoice details"
Invoice status
This value can be changed manually before posting or fixing; further changes to the payment status are then derived from the change to the clearing status of the open item.Language
Is preset from the customer, relevant for the layout rule assistant.Country code
Is preset from the invoicing party's main business focus for VAT purposes, but can also be selected from other countries in which the invoicing party is liable for tax. This information must be entered in your own company settings under Organization > Administration > Companies: Manage company > GO Company settings .
The country code determines the assignment to the advance VAT return.Place of performance
The field is pre-assigned from the address of the invoice recipient.Tax subject
The tax subject controls the revenue account and tax key determination in conjunction with the revenue account preallocation depending on the product type.Price indication
Control whether the prices are assigned net or gross. See also the information on the product master. In the case of a gross display, the line-by-line item discount is not available.Service date from ... to
The fields are also used internally to pre-assign deferred income (see below).Posting date
The invoice enters financial accounting (sales taxation, reports) on this date. You can preset this on the basis of the document or service date(billing settings).Invoice type
The default is single invoice, for down payment invoices the booking changes accordingly, you can assign down payment, partial or partial invoices to a final invoice.Down payments and partial payments
Here you can assign other invoices to a final invoice.Invoice text
The content of this text field is listed as the posting text in the financial accounting entry.Predecessor and successor
If you work with the automated document process, you can see the upstream documents (offer, order) and the downstream correction invoices here.Information for customer advisors
Customer-related data that is important for the billing process can be stored here. The content is displayed for each individual customer and is therefore visible in every invoice for the same customer.
The tabs in the lower part of the form
We have already described the functions of many tabs in the orders section. Information on the tabs that appear specifically in billing or correction invoices can be found below:
"Items" tab in the invoice
For a preselected individual invoice (5), scroll down and click on Templates (6) if you want to use an existing invoice template. In this case, select the corresponding template in the following pop-up window, which you can edit further or accept unchanged. Use the Apply button to return to the invoice.
If necessary, add the template used with (7). Otherwise, work without a template and create your invoice by also adding the desired items with (7). The mandatory fields to be filled in are (8) and (9), the other data fields take their information from the information stored in the product master. The account assignment (10) also adjusts automatically due to the correlation of LC, place of performance and tax facts described above if manual changes are made in the relevant fields.
You can use (11) to delete or copy entire item lines (12) and the arrows offered under (13) to change their order.
If you have granted the selected customer a discount in their contact file under terms of payment, this is automatically applied under (14). However, you can also enter a percentage or absolute discount manually, which will then overwrite the original discount.
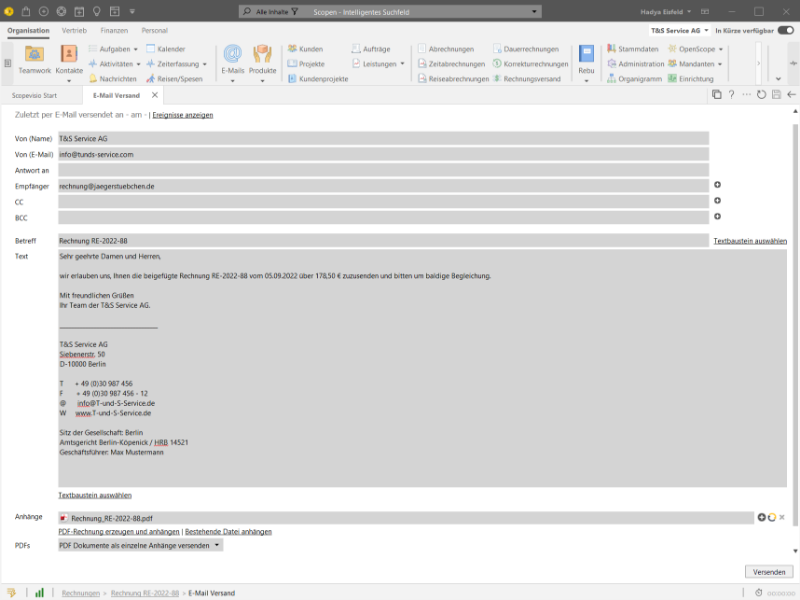
To send your invoices directly by e-mail, click on the Send button (15). The e-mail can be sent directly from the program. It will be sent to the recipient's e-mail address stored in the contact details. In the form that opens, you also have the option of customizing the text of the e-mail and adapting it with the help of text modules. The standard layout for invoices defined under Master data > Document layouts or the layout defined by the rule wizard is used as the basis for the attached PDF document.
You can use the $Logo placeholder to store your company logo in the email. Upload a graphic file as a logo in the contact of your company(Setup Assistant > Company) and insert the placeholder in the text module used for the email.
If you want to create your invoice as a PDF for printing, edit it in LibreOffice or assign another document layout in .dot or .odt format instead of sending it by email, you can do this under (16). More about document layouts can be found in this chapter.
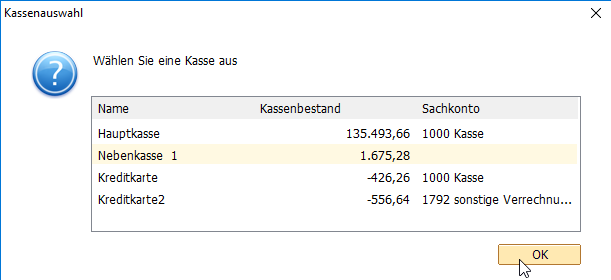
You can also enter an immediate payment using the multifunction button (16). This means that the customer pays the invoice in cash on the spot. The cash payment is collected in a cash register. If you select this option and click the button, a window will open in which you can specify which cash register should be used to collect the money. Make sure that the corresponding cash sheet is open.
The invoice is recorded and saved by clicking on Post (17).
If you want to create a credit note, transfer all items from the original invoice with (18).
As long as an invoice has not been posted, but you still want to save it, save the interim status with (19).
If you want to enter individual data that differs from the master data, you can use the other tabs at the bottom of the form. Details about the individual tabs can be found in the article Orders.
"Documents" tab in the invoice
If you would like to embed a document in an XRechnung, you can upload it here and mark
as an export XRechnung.
"Bookings" tab in the invoice
If the invoice has already been posted, the corresponding posting can be found here. The same applies to assigned payments.
"Incoming payments" tab in the invoice
If you do not work with Scopevisio Financial Accounting, enter incoming payments belonging to the invoice manually here.
"ZUGFeRD" tab in the invoice
If you have selected under Organization > Master data > Billing > Edit billing settings > Document creation: Create invoice PDF as ZUGFeRD: Invoice data convenience, you can enter data for the ZUGFeRD file to be generated that differs from the information stored in the customer or vendor tabs in the contact file. This does not overwrite the contact's master data, but only applies to this one document. See also electronic invoices.
"XRechnung" tab in the invoice
As an option to the routing ID stored in the customer, you can enter further information relevant to the respective document here. See also electronic invoices.
"Accruals" tab in the invoice
The "Accruals" tab can be found in both the Billing and Correction invoices/credit notes views.
This allows you to defer services that have not yet been rendered but have already been invoiced and reverse them via recurring entries. This is not only an obligation when preparing the balance sheet and the period of performance beyond the balance sheet date, your reports will also be more informative if you are only accruing during the year.
Enter
as a deferred income account (PRAP) the corresponding passive balance sheet account. In SKR03, account number 0990 is provided for this purpose,
the deferred revenue account. A specially created revenue account is recommended to enable net deferral (no pre-assigned tax key) and a different report assignment. You can assign individual accrual offsetting accounts to the revenue accounts in the G/L account master.
The accrual period is set to monthly.
The number of accrual postings is calculated automatically by setting the service date and service date to. Alternatively, this value can also be set manually.
Based on your previous entries, Scopevisio proposes an accrual amount that is evenly distributed over the number of accrual postings. You can adjust this manually.
When posting the outgoing invoice, Scopevisio also posts the entire amount to PRAP via an accrual contra account and creates an automatic recurring posting plan based on the parameters, which then reverses the PRAP.
We recommend that you mark the selected PRAP account as reconcilable and carry out a regular G/L account reconciliation.


.png?version=1&modificationDate=1712912829511&cacheVersion=1&api=v2&width=250&height=139)
.png?version=1&modificationDate=1712912829518&cacheVersion=1&api=v2&width=250&height=69)
